
个性化内容可以给您的用户带来惊喜,并根据他们的偏好、使用历史记录和语言区域,从他们与应用的第一次互动就开始提供个性化的体验。Firebase 可让您根据 Google Analytics指标,并自定义您的应用, Firebase Remote Config控制台。Firebase
通过结合使用这两项功能,您可以自定义应用的欢迎回来 向其展示您的应用。
本指南将引导您完成在 Android 上创建自己的个性化“欢迎回来”屏幕的过程。
首先,您需要一个关联到 Firebase 项目的 Android 应用。如果您还没有这样的应用,请参阅面向 Android 的使用入门,以关联您的应用。
实现概览
实现应用个性化欢迎屏幕包括 3 个主要步骤:
- 设置 Remote Config 以存储要 个性化。例如,您能以参数的形式存储欢迎屏幕消息。这样,您就可以更新此消息而无需重新发布您的应用。
- 设置 Analytics 以定义受众群体和/或用户属性 Remote Config来定位您的用户。这两个功能都可以用于定位;然而,它们之间有很大的区别。本指南稍后将讨论它们各自的相对优势。
- 配置 Remote Config 条件,以根据以下条件自定义参数 您设置的Analytics受众群体或用户属性。
在 Remote Config 中设置参数
确定要自定义的应用元素后,请使用 Remote Config,用于存储参数。我们将在本指南的其余部分中介绍如何打造个性化欢迎屏幕消息。
在 Firebase 控制台中的操作
- 前往 Remote Config 参数 页面。Firebase如果 如果您从未在应用中配置过 Remote Config,请点击添加您的第一个 参数。
填写参数键和默认值,例如
welcome_message和Welcome to this sample app。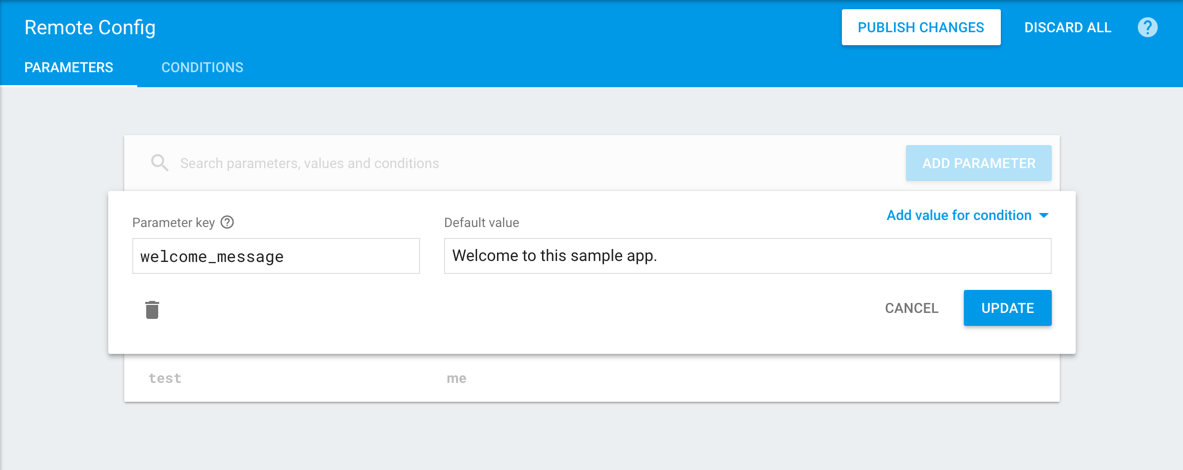 Remote Config 参数配置。">
点击发布更改。
在 Android 应用中的操作
添加代码以读取并显示您刚在 Firebase 控制台。例如:
final FirebaseRemoteConfig config = FirebaseRemoteConfig.getInstance();
config.getInstance.fetch(CACHE_EXPIRATION_MS)
  .addOnCompleteListener(this, new OnCompleteListener<Void>() {
    @Override
    public void onComplete(@NonNull Task<Void> task) {
        if (task.isSuccessful()) {
            config.activateFetched();

            String welcomeMessage = config.getString("welcome_message");
        }
    }
});
您也可以按照 在 Android 上使用 Firebase Remote Config 以读取并显示您在控制台中创建的参数。如果您 Android 演示指南 了解有效的示例应用实现。
开启开发者模式,以便在测试时立即看到配置更改。
测试是否生效
- 打开您的应用,并确保它显示参数的当前值 在 Remote Config 界面中。
- 在控制台中更改值,然后点击发布更改。
- 重启您的应用。此时应显示新的参数值。
设置Analytics受众群体或用户属性
在此步骤中,您将使用 Analytics 来定义哪些用户应看到 个性化的内容。在本演示中,我们将使用用户属性来执行此操作 但您也可以定义 受众群体。 这些方法是类似的,但您应注意,一旦用户添加到受众群体,他们就无法离开或被移除。如果用于定位的属性可能会更改,请改用用户属性。
在 Firebase 控制台中的操作
- 前往 Analytics 用户属性 页面。Firebase点击新建用户属性。
为用户属性命名并提供描述。例如,如果您基于用户是喜欢狗还是猫来自定义应用,则可以将其命名为
animal_preference。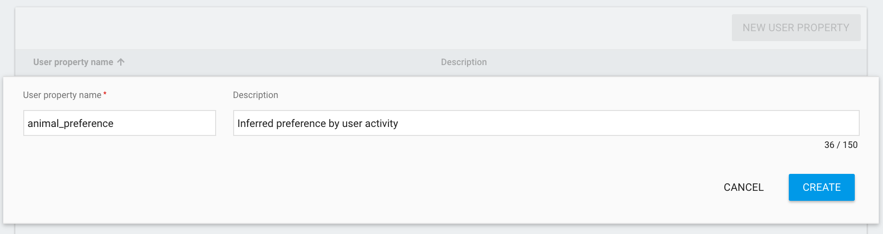 Analytics 用户属性配置。">
点击创建。
在 Android 应用中的操作
- 按照设置用户属性中的步骤学习如何在应用中设置用户属性。例如,您可以询问用户是喜欢猫还是狗,并相应地设置字符串值。您可以跳过在控制台中注册属性的步骤,就像在上一部分中的操作一样。
- 按照调试事件中的步骤为您的应用启用调试模式。
测试是否生效
- 打开您的应用,并导航到设置用户属性的位置。
- 打开 Analytics DebugView 页面 (位于 Firebase 控制台中)。
- 查看是否设置了任何用户属性(相应内容可能会延迟几分钟才显示)。
配置 Remote Config 条件
现在您的应用有了可配置的参数、用作变量的用户属性(或受众群体),您可以创建条件来个性化参数的值。
在 Firebase 控制台中的操作
- 前往 Remote Config (位于 Firebase 控制台中)。
- 点击参数并进行修改。
- 点击添加条件的值。
- 选择定义新的条件。
- 为条件指定名称。例如,“喜欢猫”可反映之前的用户偏好。
在适用条件下,选择用户属性(或受众群体中的用户,如果是 您在“Analytics”中创建了一个受众群体),并选择您的参数,然后 定义与您的参数值的条件关系。
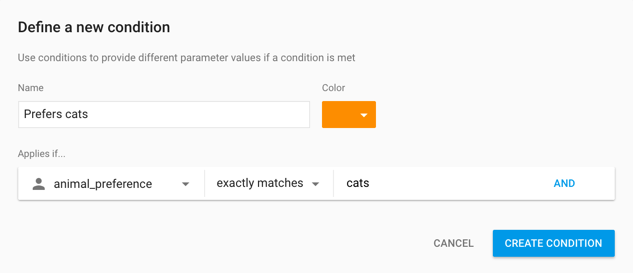 Remote Config 条件。">
点击创建条件。
输入一个值来反映新条件。例如,可以用“喵!”作为向“喜欢猫”的用户显示的欢迎信息。
点击更新以保存更改。
点击发布更改以在应用中启用新的条件和值。
测试是否生效
- 打开您的应用,并导航到设置用户属性的位置。
- 打开 Analytics DebugView 页面 (位于 Firebase 控制台中)。
- 查看是否设置了任何用户属性(相应内容可能会延迟几分钟才显示)。
- 重新启动您的应用,并验证是否已设置个性化元素。